
User Manual
Welcome to the Wine Club Connection, a premier WordPress plugin explicitly designed to streamline your wine club's operations. Our advanced features, like easy membership level management, tailored shipping settings, integrated payment processing, product creation for membership levels, and intuitive member management, make running your wine club a breeze. With our unique batch order processing, you can manage orders efficiently and effortlessly. Whether you're an established wine club or just starting out, our plugin helps to elevate your member's experience and simplify your backend processes. Leverage the power of Wine Club Connection, and take your wine club to the next level.
Table of Contents
Getting set up
Installation and Activation
Membership Levels
The Welcome Email
Shipping
Payment Processing
Products for Membership Levels
Members-only Products
Running your club
Member Management
Batch Order Processing
Dry Run Mode
One-off Orders
The Wine Picker
Integrations
Installation and Activation
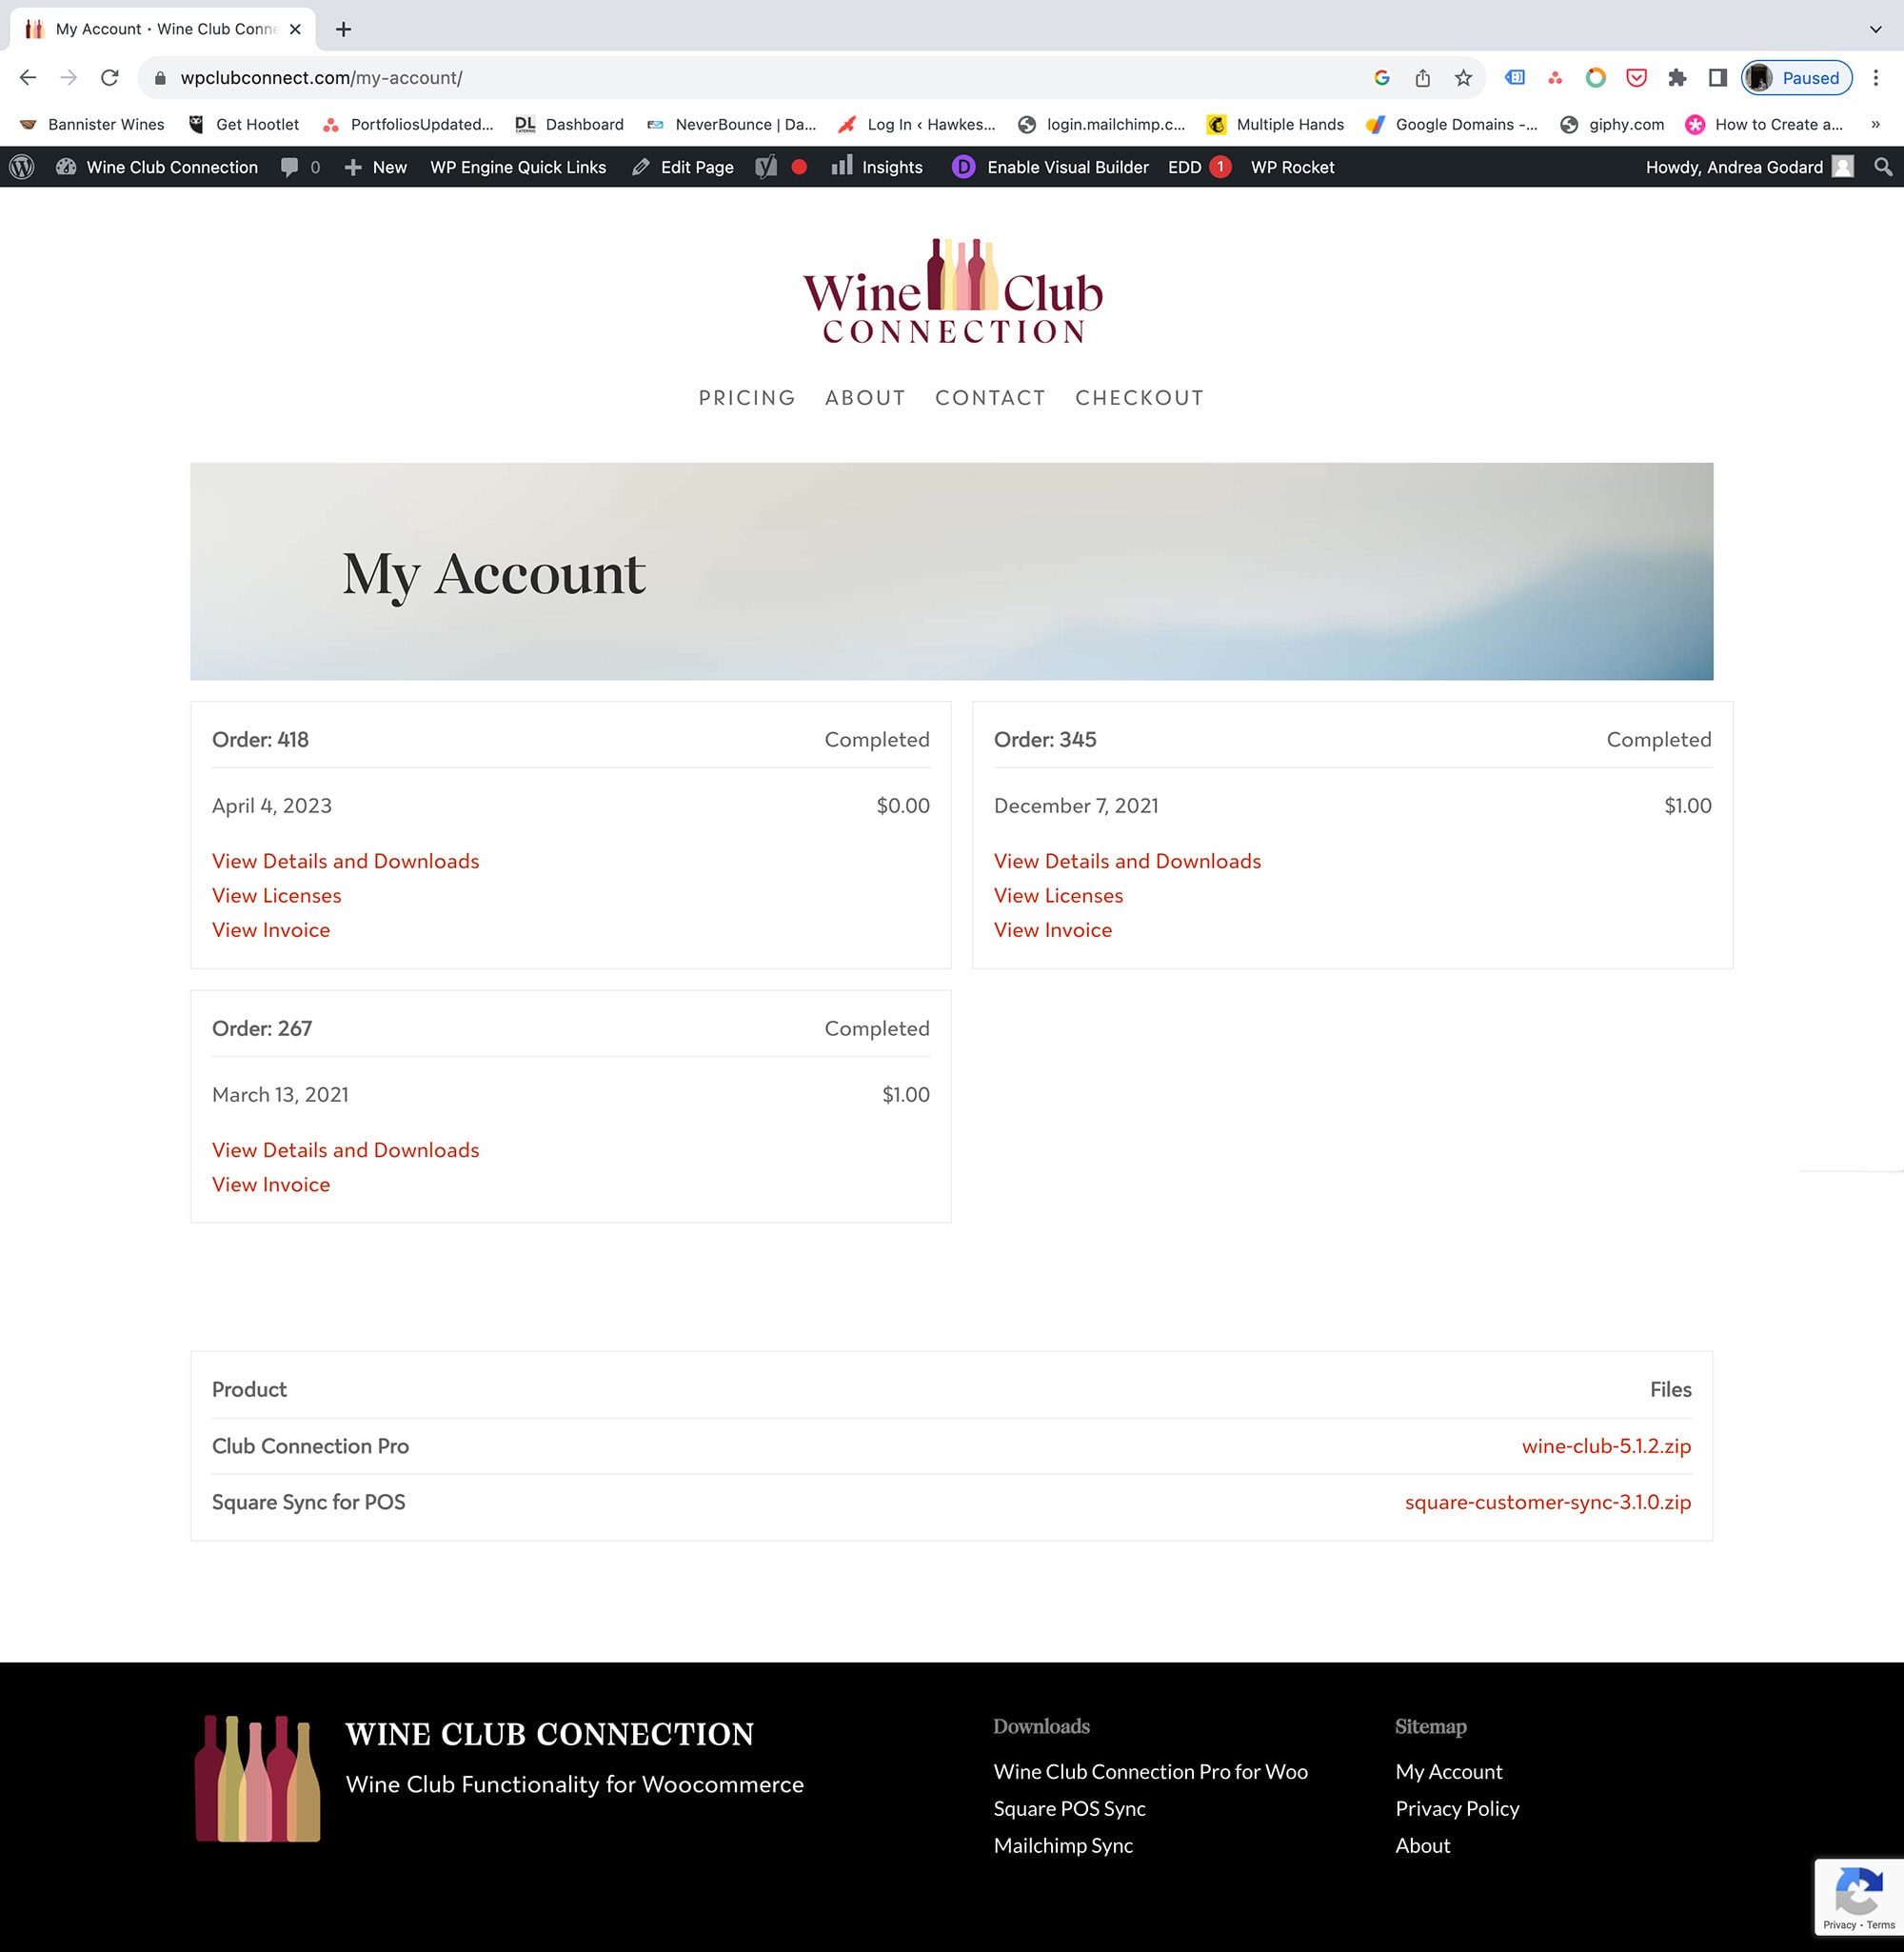
- Visit My Account on wpclubconnect.com and click View Details and Downloads to find your order history, license keys and download links.
- Download the plugin zip.
- In your WordPress site, go to Plugins → Add New → Upload Plugin and upload it.
- Activate the plugin.
- Go to Club Connection → General, paste your license key, click Activate License, then Save Changes.
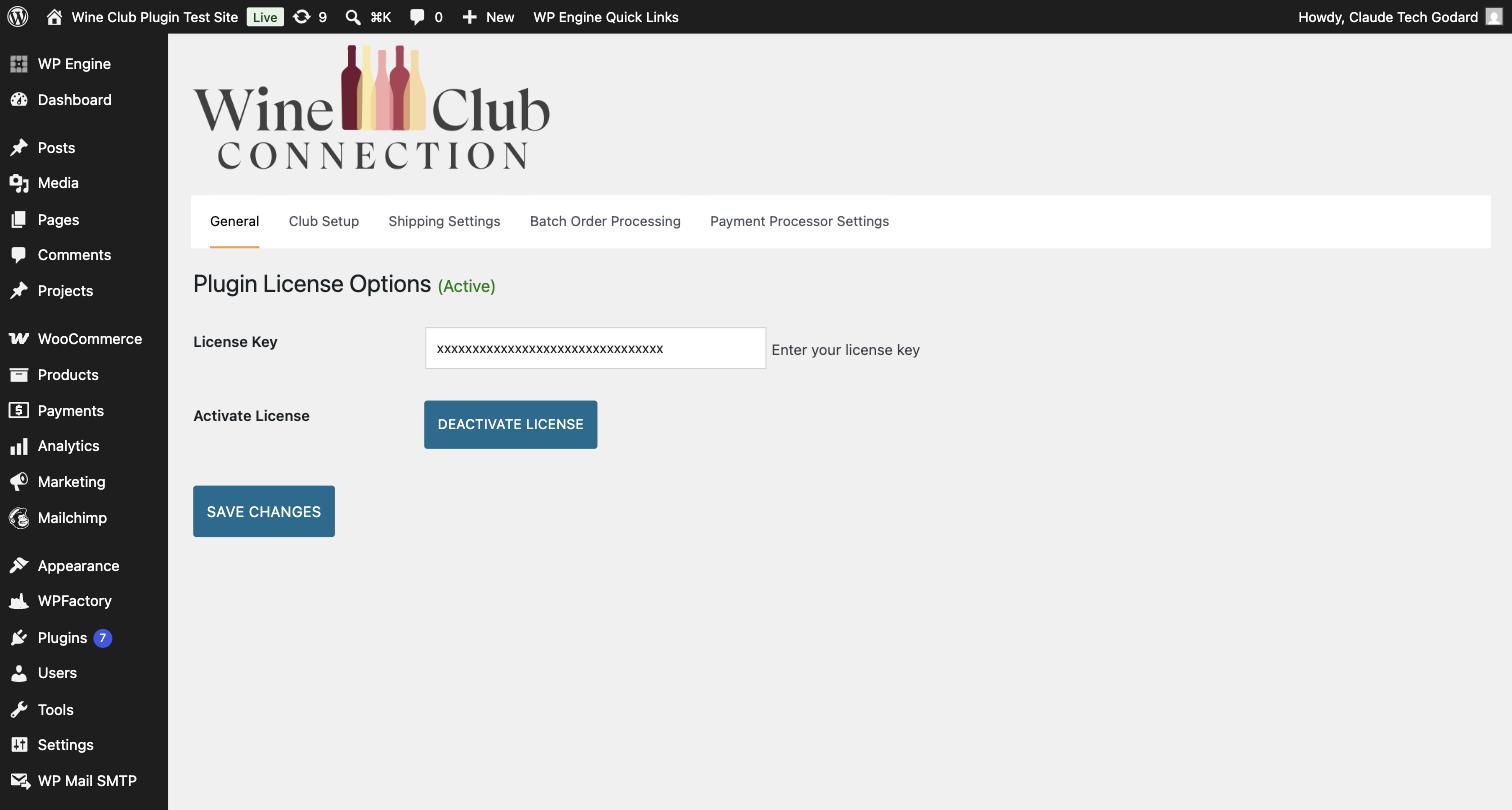
If you only see "Plugin License" in the menu, the license hasn't validated. The full menu appears once it does, and the heading changes to Plugin License Options (Active).
WooCommerce is required. Club Connection is a WooCommerce extension, not a standalone plugin. Install and configure WooCommerce first, including at least one shipping zone.
Updating. Once your license is active, new versions appear under Dashboard → Updates like any other plugin. Take a backup before updating, as you would with anything that touches orders.
Membership Levels
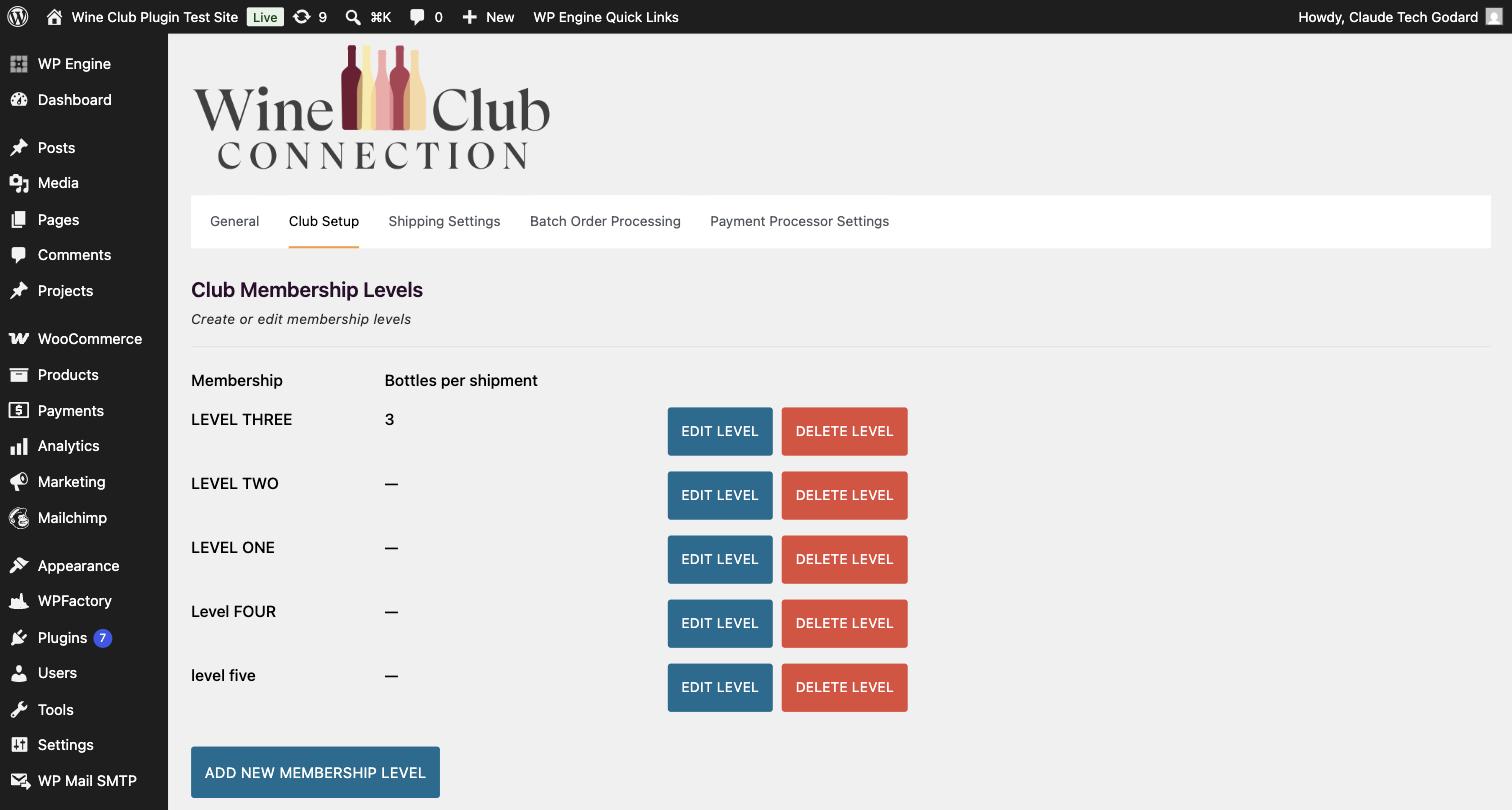
Club Connection → Club Setup lists your clubs with their bottles per shipment, and gives you Edit level, Delete level, and Add new membership level.
Open a club and you get the whole definition on one screen.
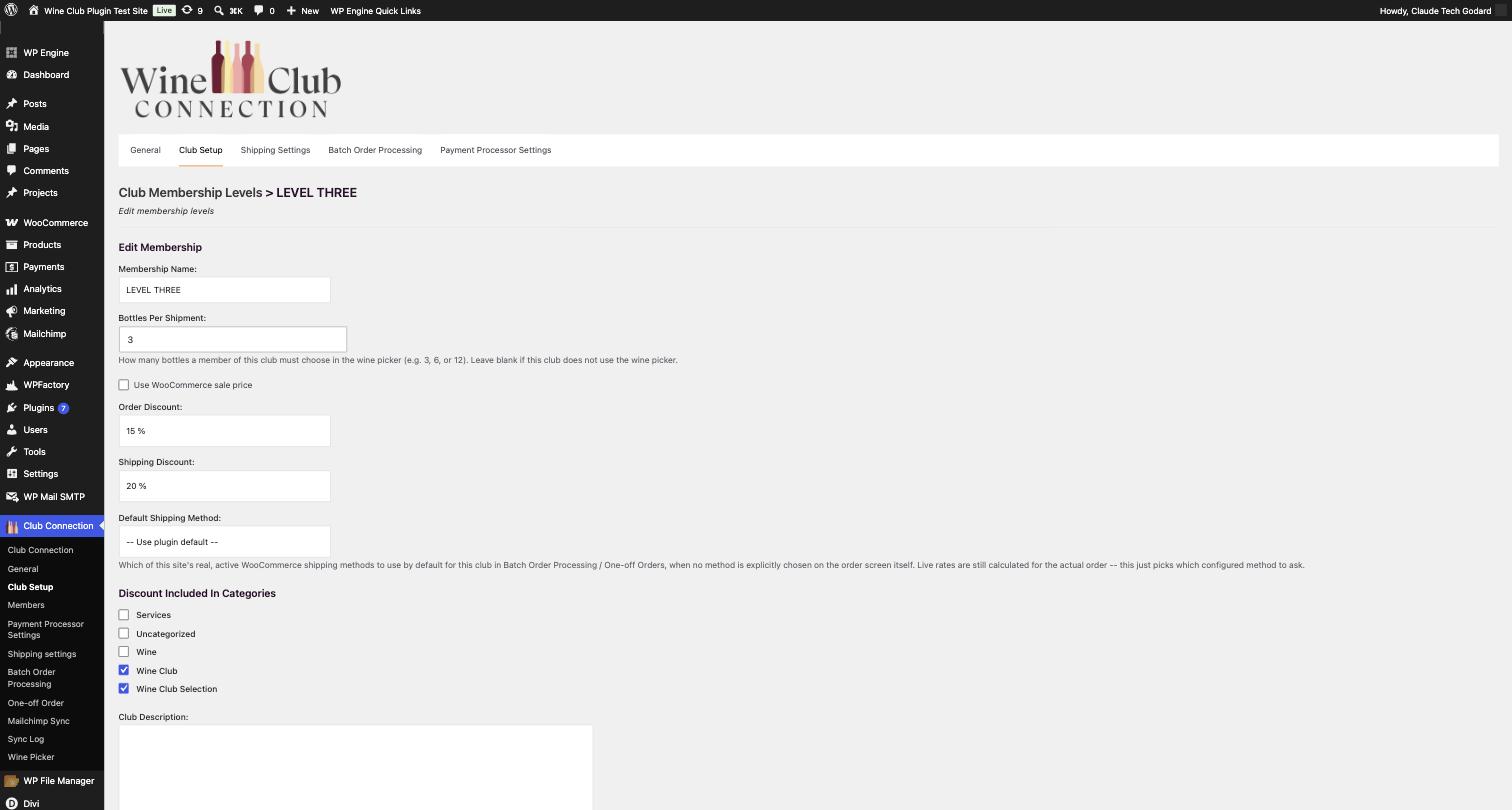
| Field | What it controls |
|---|---|
| Membership Name | What members see |
| Bottles Per Shipment | How many bottles this club's members choose in the wine picker. Leave blank if the club doesn't use the picker |
| Use WooCommerce sale price | Calculate the club discount from the sale price rather than the regular price |
| Order Discount | Percentage off products, applied everywhere on your site |
| Shipping Discount | Percentage off shipping. 100 means free shipping |
| Default Shipping Method | Which of your real, active WooCommerce methods this club uses when no method is chosen on the order screen |
| Discount Included In Categories | Which product categories the discount applies to |
| Club Description | Internal note |
Discount categories are required for the discount to do anything. A club with a 15% Order Discount and no categories ticked discounts nothing. This is the most common setup mistake.
Bottles Per Shipment is what turns a club into a wine-picker club. Leave it blank and the club always ships whatever you choose during a batch run. Set it to 3, 6 or 12 and members can choose their own wines up to that number. See The Wine Picker.
Default Shipping Method decides which configured method this club asks for. Live rates are still calculated for the real order. This only picks which method to ask.
Deleting a club. You can't delete a club while members are still on it. The plugin blocks it and tells you how many are affected, so nobody is stranded without a club.
The Welcome Email
The bottom of each club's edit screen sets the email that goes out when someone joins.
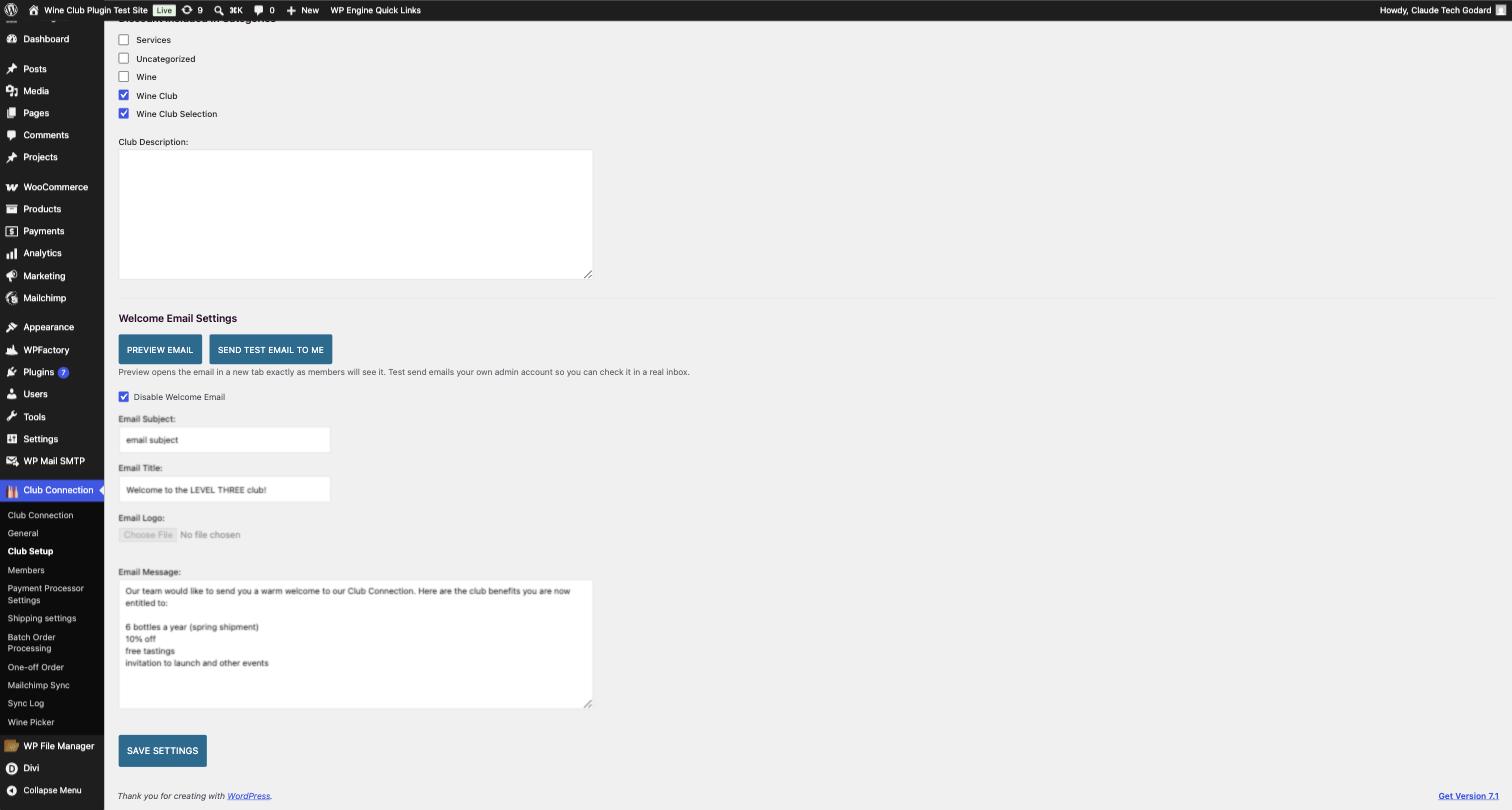
- Preview email opens it in a new tab exactly as members will see it.
- Send test email to me delivers it to your own admin account so you can check it in a real inbox.
- Disable Welcome Email turns it off for this club without losing the wording.
- Email Subject, Email Title, Email Logo and Email Message are per club, so each club can have its own voice and its own benefits list.
The club name and phone in the footer come from Payment Processor Settings, not from here.
Preview and test before a real member ever receives it. The welcome email is the first thing a new member sees from you.
Shipping
Shipping comes from your own WooCommerce shipping zones. The plugin asks WooCommerce what's actually configured on your site and uses the real, live rate. Nothing is hardcoded, so whatever carrier setup you run will work.
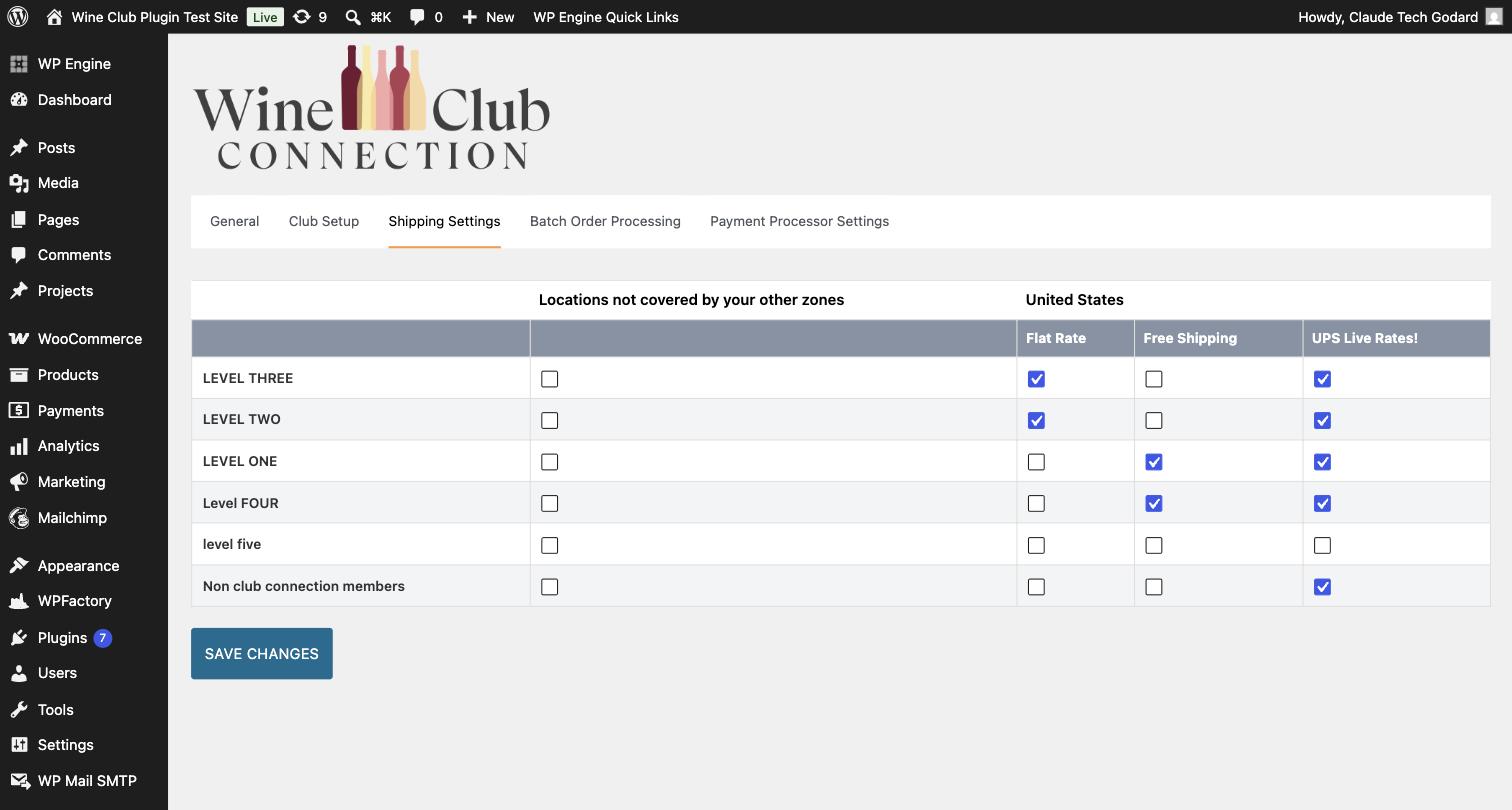
The Shipping Settings screen
Club Connection → Shipping Settings is a grid. Your clubs run down the left, with a Non club connection members row at the bottom. Your real WooCommerce shipping methods run across the top, grouped under the zone they belong to. Tick which methods each club may use.
Which rate a member actually gets
Order of precedence, highest first:
- A member flagged for local pickup always gets local pickup, whatever the run says.
- Local pickup, free shipping, or a flat rate chosen on the batch order screen.
- Any other method chosen on the batch order screen.
- The club's Default Shipping Method.
- If neither is set, the plugin falls back to UPS live rates.
Once a method is resolved, the plugin asks WooCommerce for that method's live rates for this order's real destination and contents, and takes the cheapest option unless you picked a specific service. The club's Shipping Discount percentage comes off whatever rate is found, and the order line shows both, like UPS Ground $18.40 (Discount - 20%).
Set a Default Shipping Method on every club. With no default and no override, the fallback is UPS live rates, which is a guess, not a setting. If you don't run UPS, that guess resolves to nothing and the order is created without a shipping charge.
If no rate can be found at all, the order is still created rather than blocked, with a note asking you to check shipping manually. You'll never silently ship for free, but you will need to add the charge yourself.
Carrier settings live in WooCommerce, not here. Pickup type, handling fees and the rest belong to whichever shipping extension you run, under WooCommerce → Settings → Shipping.
Payment Processing
The plugin works with Square and Stripe. Choose your processor under Club Connection → Payment Processor Settings and fill in that processor's credentials. The screen shows only the fields for the processor you've picked.
These settings apply to batch orders. Your storefront checkout still uses whatever WooCommerce payment gateway you've configured. This is about charging members' stored cards during a club run.
Stripe
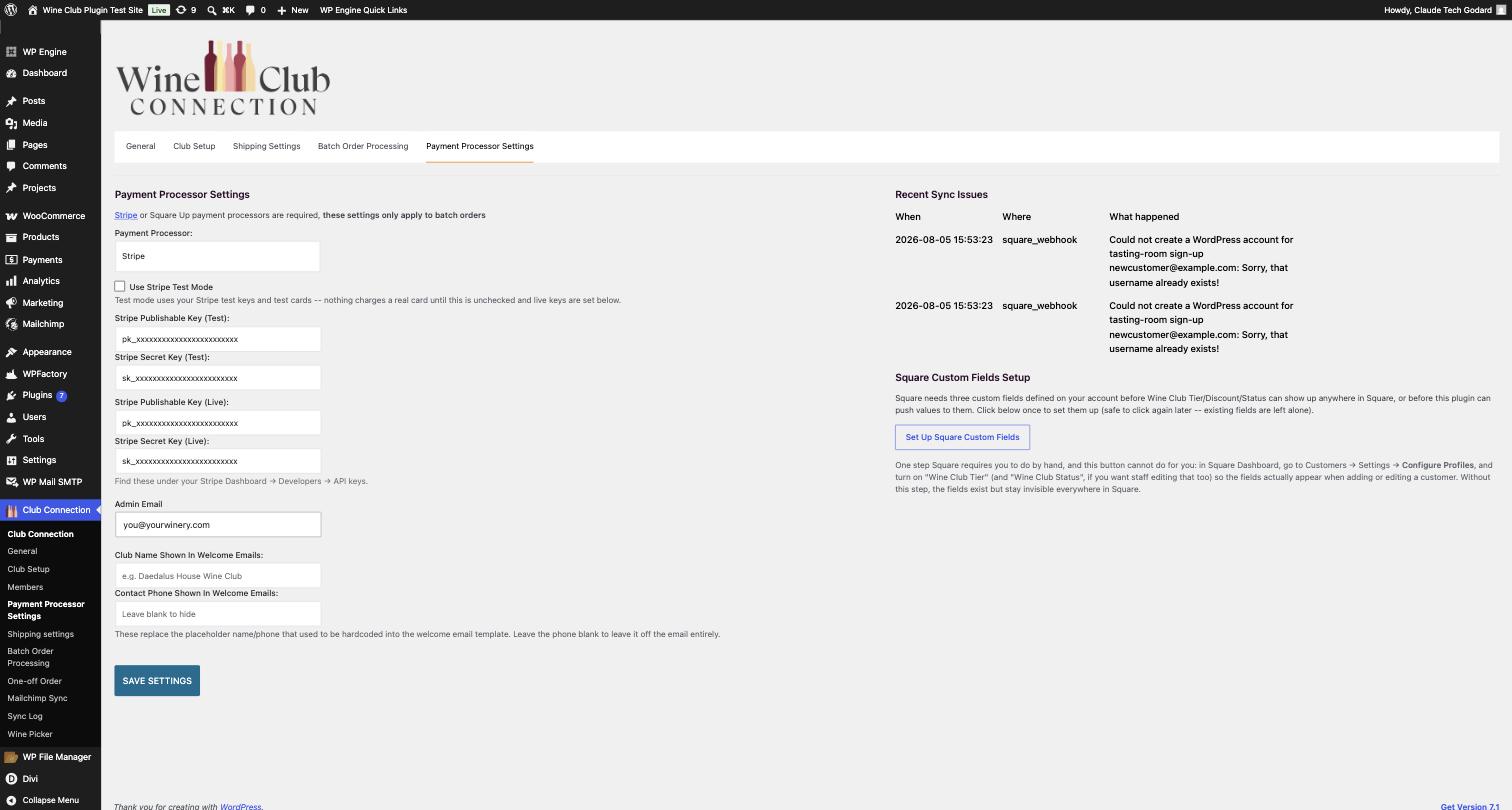
Stripe has genuinely separate test and live keys, and the plugin keeps both pairs on file.
| Field | Where it comes from |
|---|---|
| Use Stripe Test Mode | Tick to charge test cards instead of real ones |
| Stripe Publishable Key (Test) | Stripe Dashboard → Developers → API keys, in test mode |
| Stripe Secret Key (Test) | Same place, test mode |
| Stripe Publishable Key (Live) | Same place, live mode |
| Stripe Secret Key (Live) | Same place, live mode |
Keys are checked against the mode. A live secret key pasted into a test field is rejected rather than used, and the screen tells you so. Test Mode that quietly charged real cards was a real bug in earlier versions. It cannot happen now.
To verify Stripe end to end: tick Use Stripe Test Mode, save, then run a batch order against a member whose stored card is Stripe's test card 4242 4242 4242 4242.
Square

Open the developer dashboard in your Square account, create an application, and copy the SquareUp Application Id, SquareUp Location and SquareUp Access token into the matching fields.
Square keeps sandbox and production entirely separate, and so does the plugin:
- Use Square Sandbox Mode — when ticked, the plugin only talks to Square's test environment. No real customers sync, and webhooks from your live Square account will never reach the site.
- SquareUp Sandbox Access Token and SquareUp Webhook Signature Key (Sandbox) are used in sandbox mode.
- SquareUp Access token and SquareUp Webhook Signature Key (Production) are used in live mode.
A status line reads Currently running in: Production or Sandbox so you never have to guess. To go live you must both untick sandbox mode and fill in the production access token and production signature key. Do only one and real tasting-room edits in Square keep failing silently.
Square has no test mode for charges. Unlike Stripe, sandbox mode covers customer syncing, not payments. Any real batch run or one-off order with payments enabled charges real cards. Use Dry Run Mode for every test.
Also on this screen
- Set Up Square Custom Fields — creates the three Square customer attributes for you. See Square Sync.
- Recent Sync Issues — the same log as Sync Log, in-line for convenience.
- Admin Email — where the plugin's own admin notifications go.
- Club Name Shown In Welcome Emails and Contact Phone Shown In Welcome Emails — these appear in the welcome email footer. Leave the phone blank to leave it off the email entirely.
Products for Membership Levels
Each club needs a WooCommerce product that members buy to join.
- Create the product in WooCommerce.
- Open Product data → General and find Club Connection Product Settings.
- Set Membership level to the club this product enrols people in.
- Set the price.
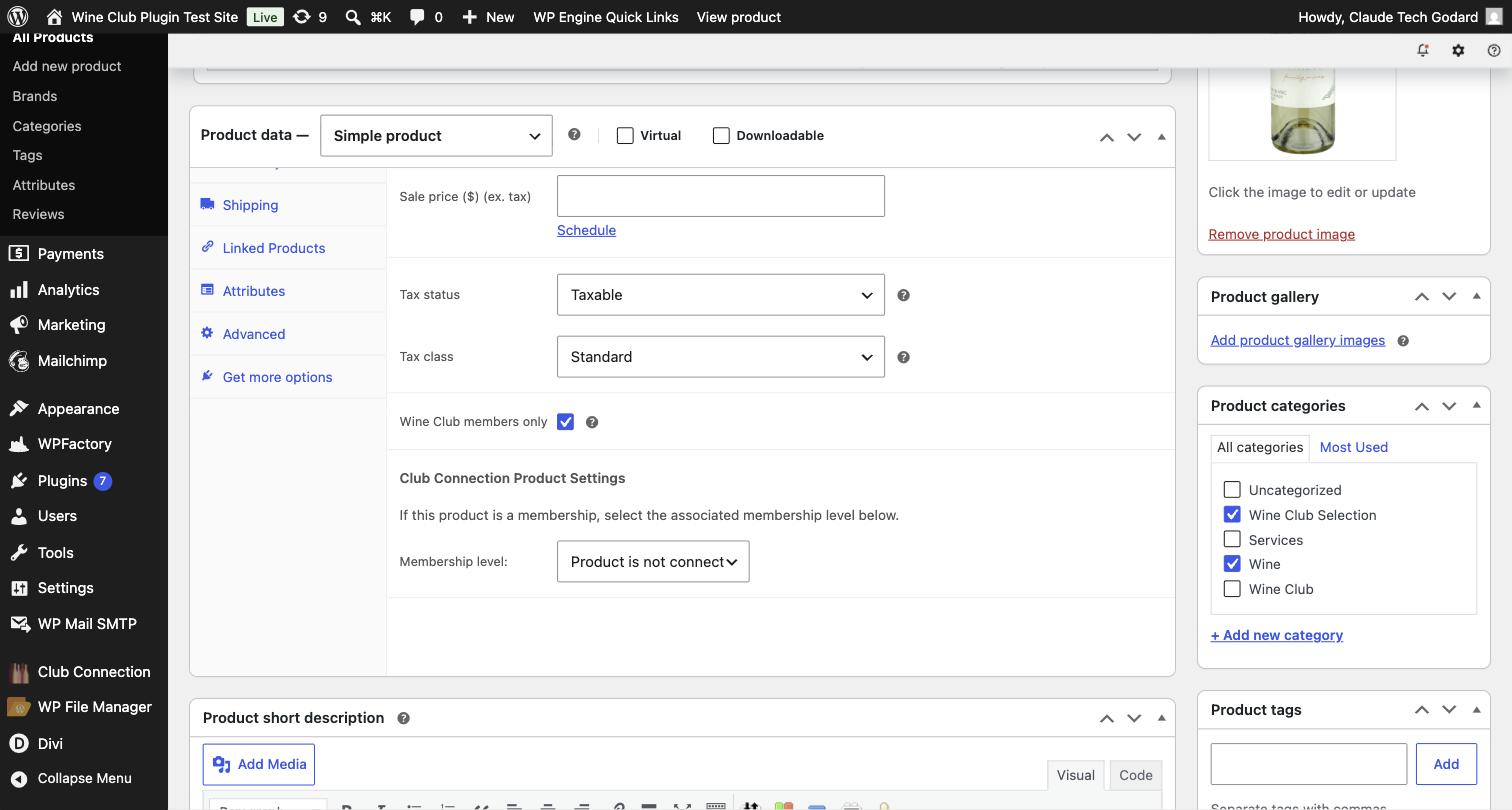
When the order completes, the buyer becomes a member of that club and the welcome email goes out. Products that aren't memberships stay on Product is not connected to a membership.
Members-only Products
Any product can be restricted to club members. Open the product, go to Product Data → General, and tick Wine Club members only. It sits just above Club Connection Product Settings, in the screenshot above.
Non-members still see the product on your site. What changes is the Add to Cart button, which is replaced with a note pointing them to membership. The restriction is enforced on the server, so it holds for the classic Add to Cart button, for WooCommerce Blocks cart and checkout, and against a direct add-to-cart link.
Paused members keep their purchase access, the same as active members. Only non-members and cancelled members are blocked.
This is per product, not per club. A members-only product is available to every club, not to one club in particular.
Member Management
Club Connection → Members lists everyone in your clubs. The tabs along the top filter by club and show a live count for each. Every column sorts: first name, last name, username, email or membership level. Export members gives you the whole list as a CSV.
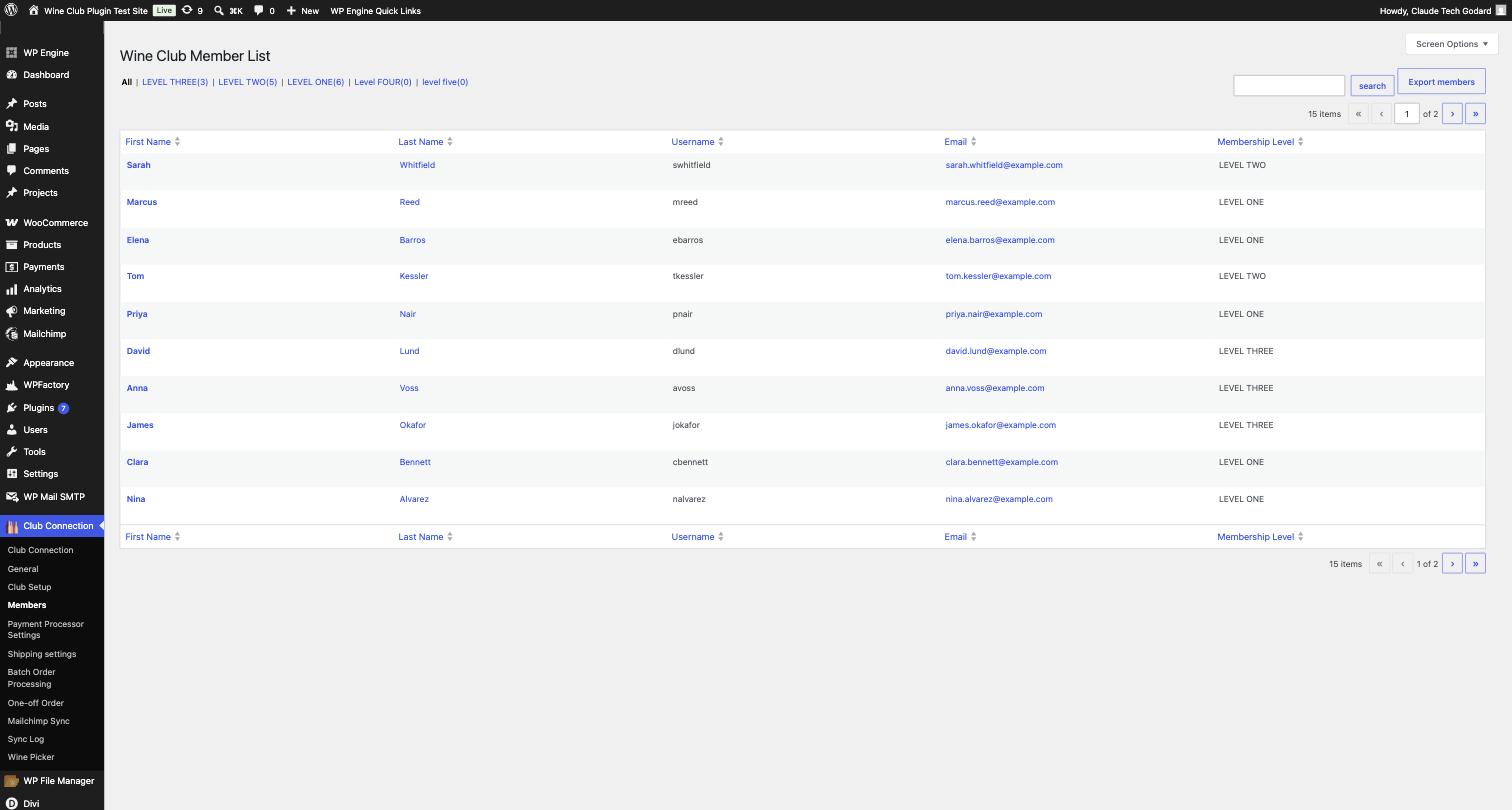
Hover a row and click Edit to open that member.
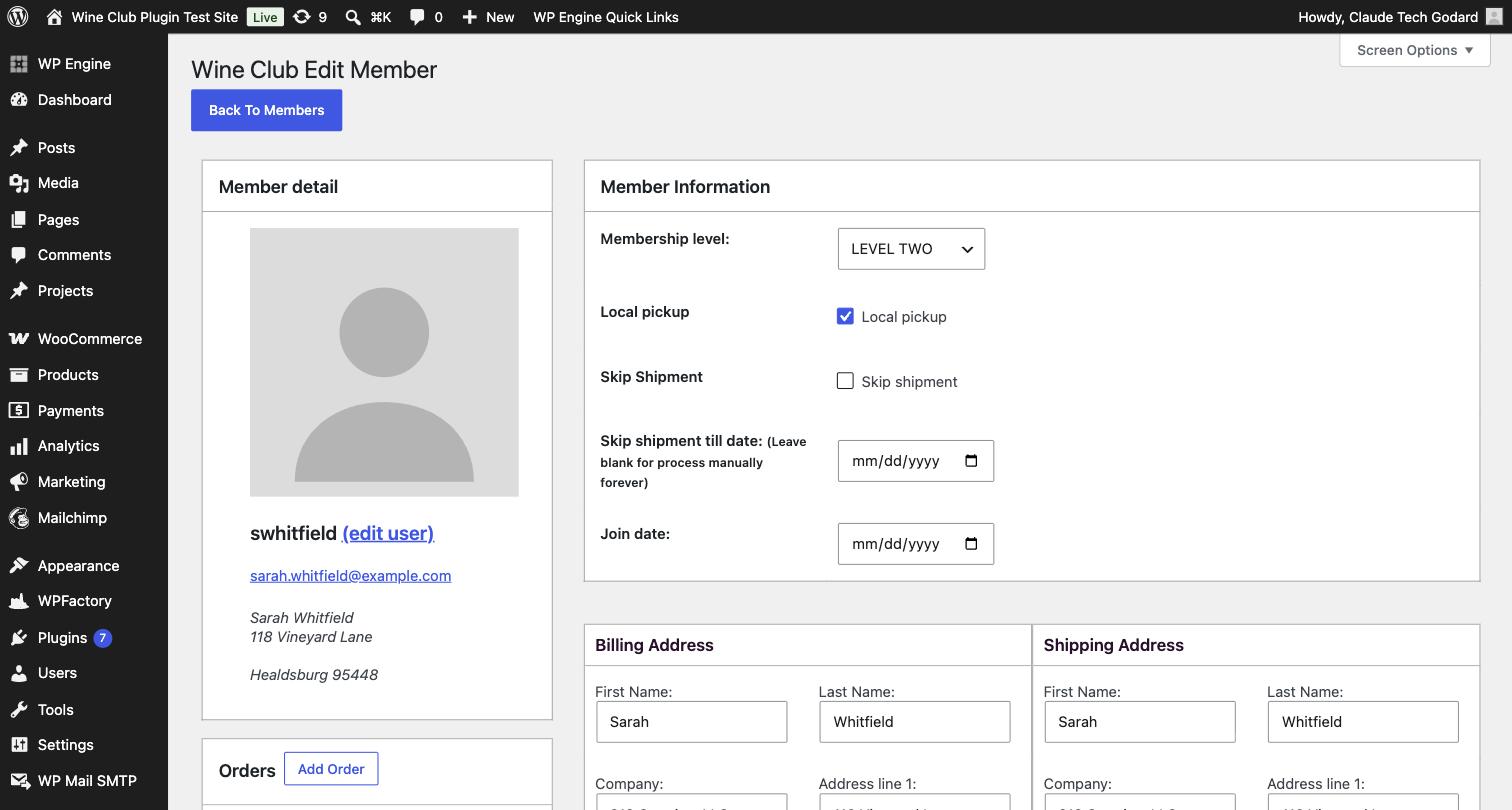
On the Edit Member screen:
- Membership level — move someone between clubs
- Local pickup — this member always gets local pickup, whatever the batch run says
- Skip shipment and Skip shipment till date — leave the date blank to skip until you manually turn it back on
- Join date, Billing Address and Shipping Address
- Orders, with an Add Order button, and Customer Notes
Click Update Member to save. The stored cards panel below is separate and saves on its own.
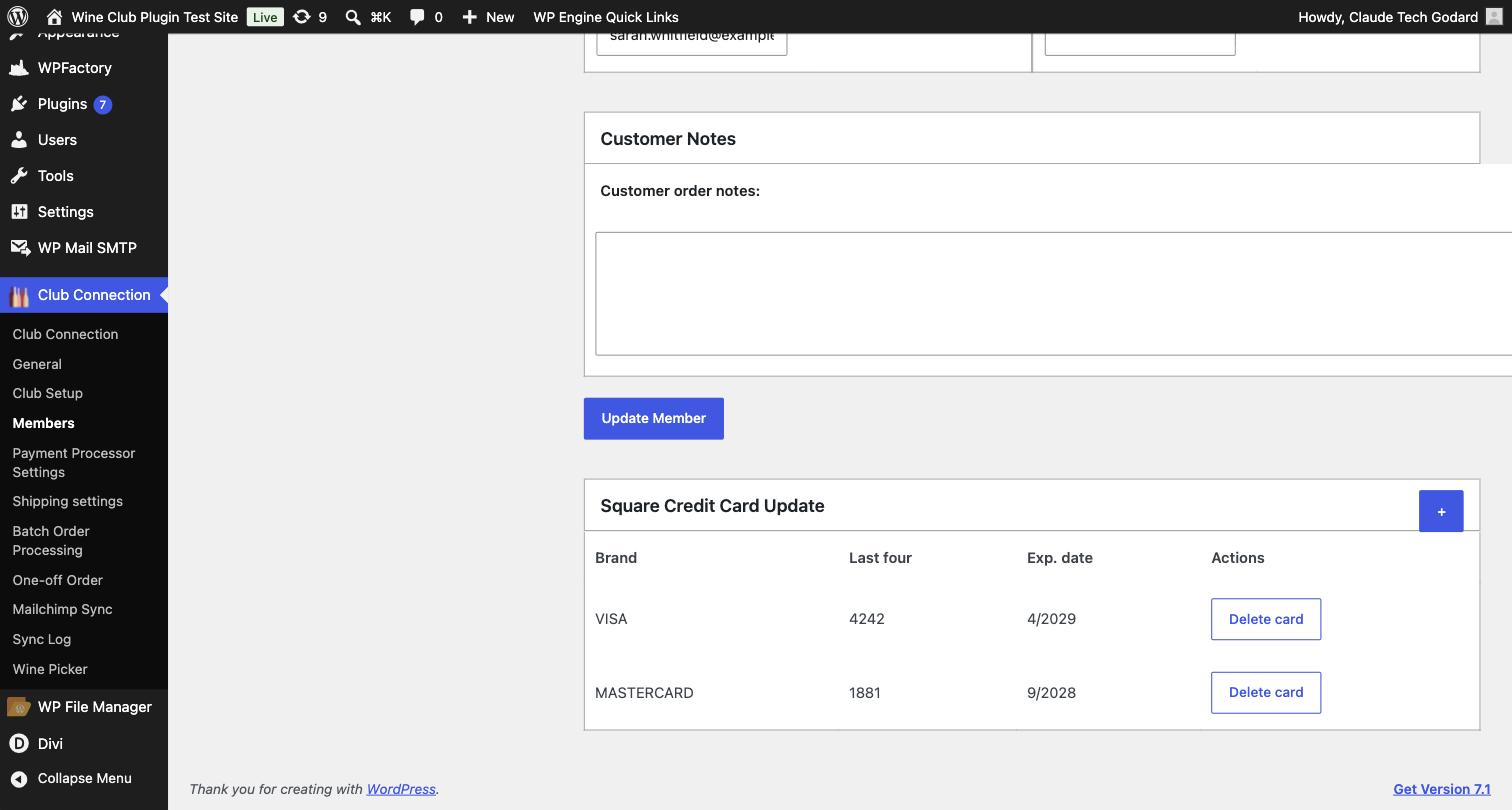
The + button adds a card for the member; Delete card removes one. The panel is titled for whichever processor you're running.
A note on counting members. When someone cancels, their record is kept and their club is cleared. The club tabs count only current members, which is what you want. If you ever count members directly in the database, exclude anyone whose club is zero or you'll roughly double your numbers.
Members can manage themselves too. From My Account they can switch clubs and pause their membership. Both changes sync to Square and Mailchimp immediately.
Batch Order Processing
This is how you ship a club release. Three steps.
Step 1 — choose the club
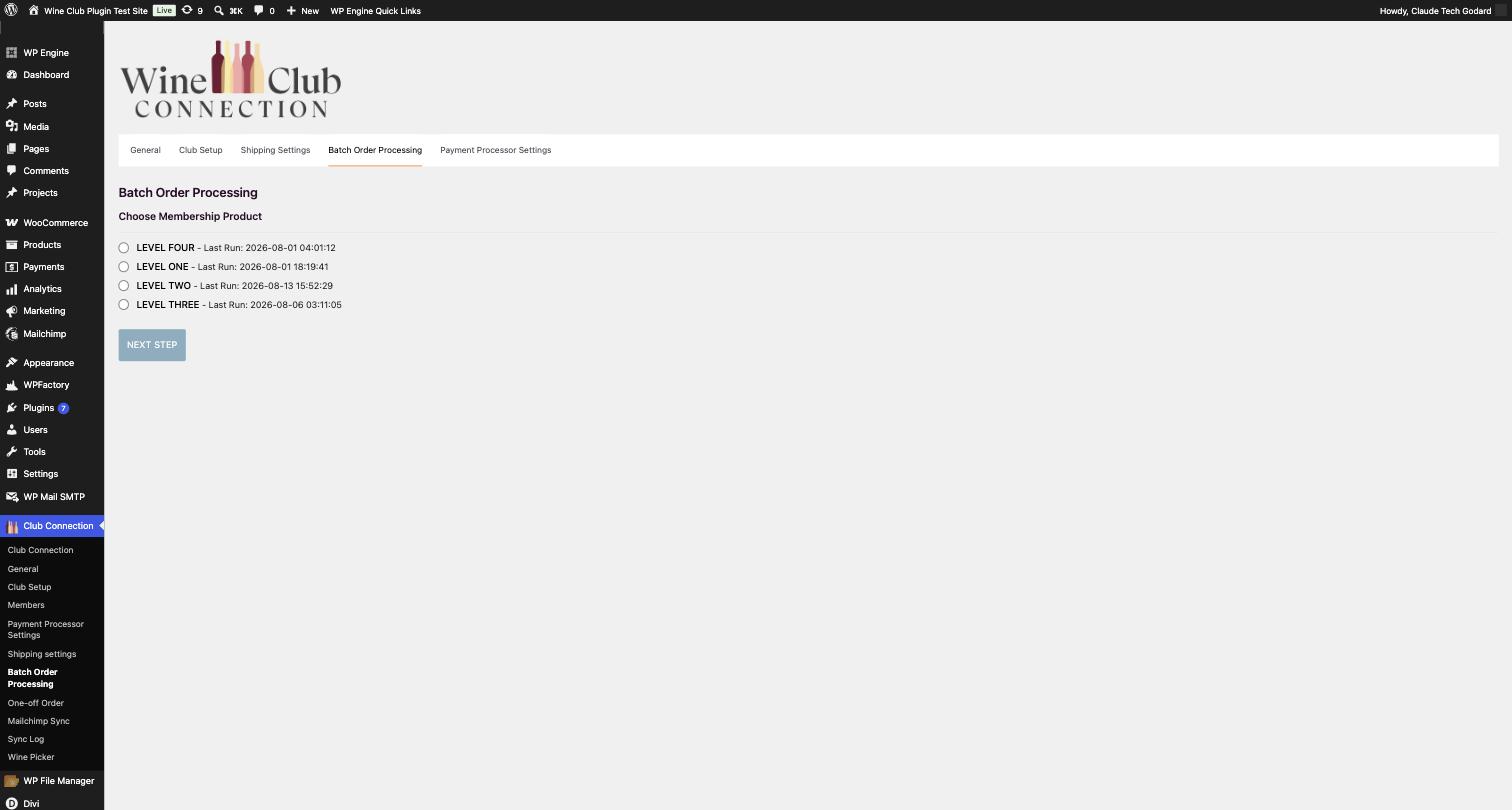
Each club shows its Last Run date, which is the quickest way to confirm you're not about to ship the same release twice.
Step 2 — choose the wines
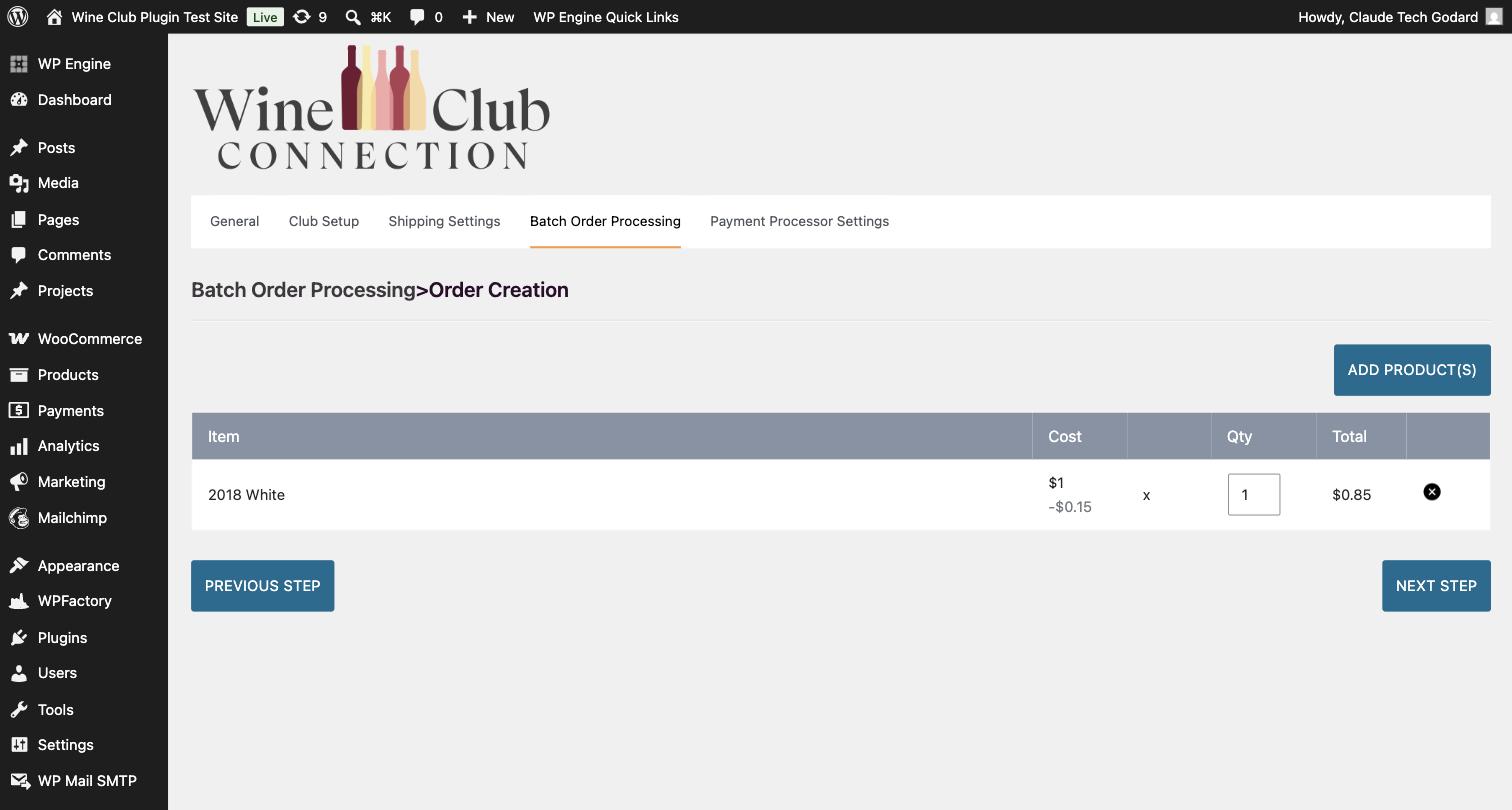
Add Product(s) opens a search. Pick a wine, click Add, and set the quantity. The Cost column shows the club's discount applied per line, so the Total is what members will actually be charged for the wine.
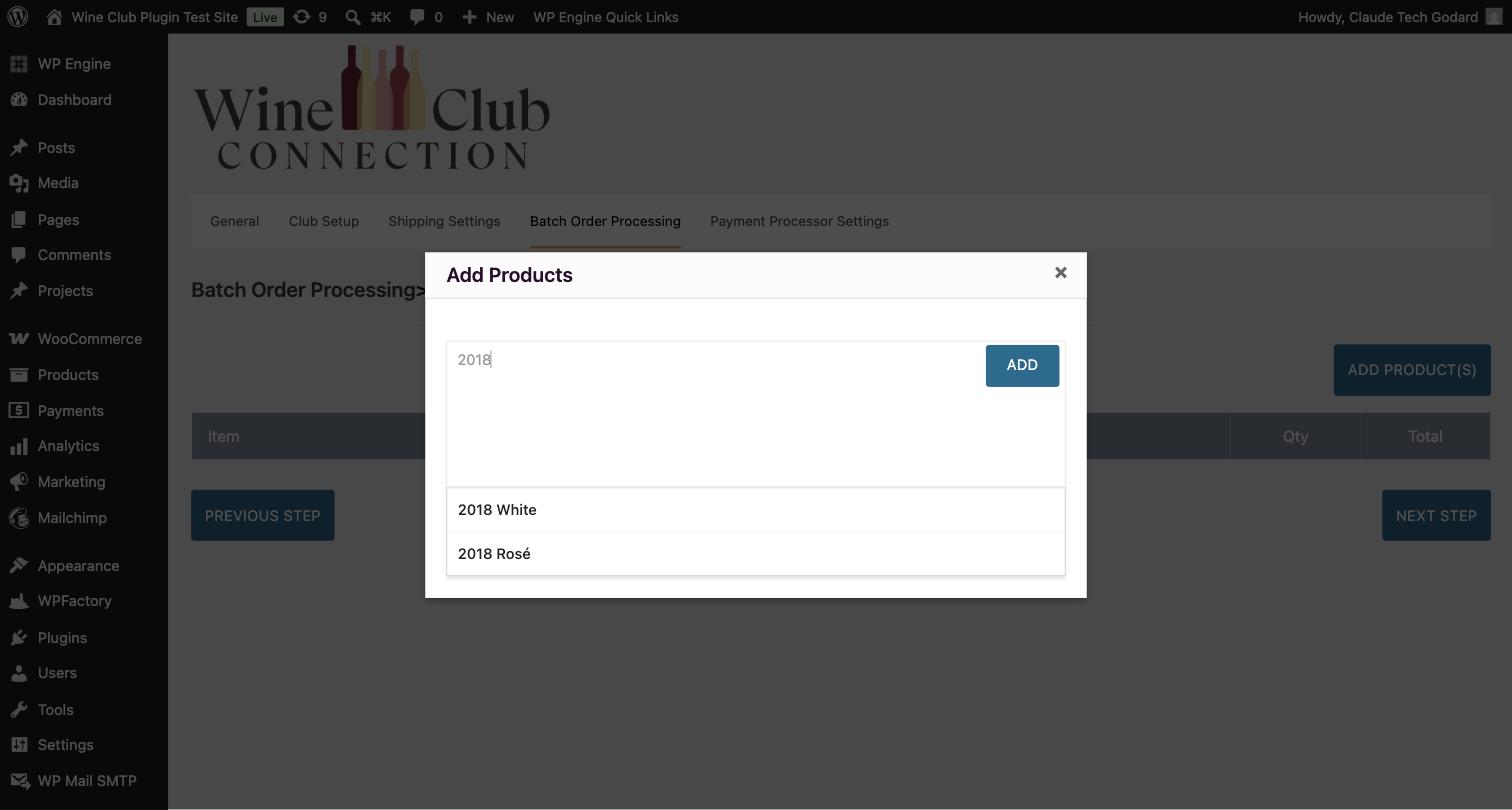
The product search matches from the start of the name. Searching "2018" finds "2018 White." Searching "white" finds nothing. Type the beginning of the wine's name.
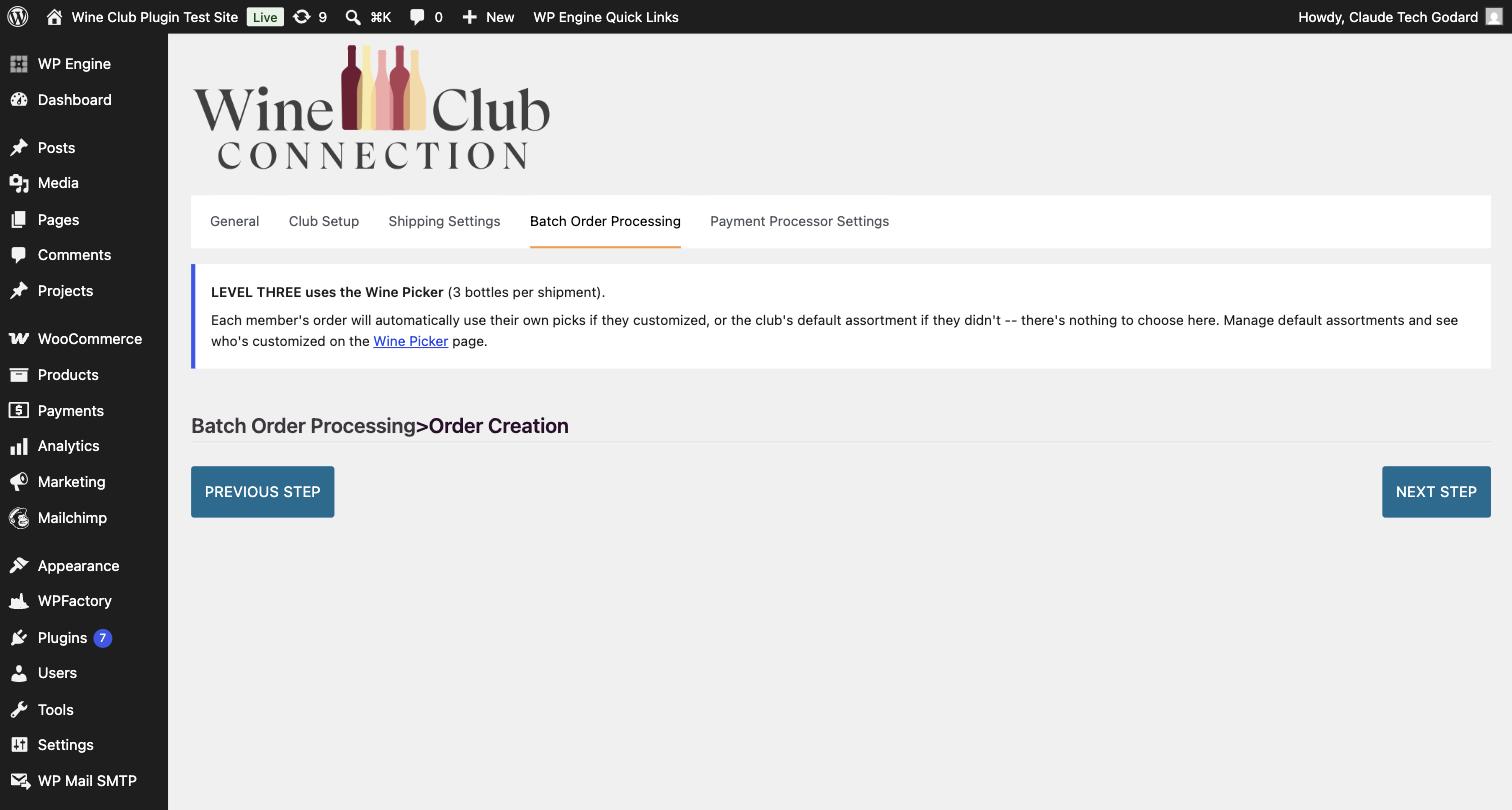
If the club uses the wine picker, Step 2 has nothing to choose. You get this instead, which is correct: each member's own selection is used.
Step 3 — choose members and how the order is created
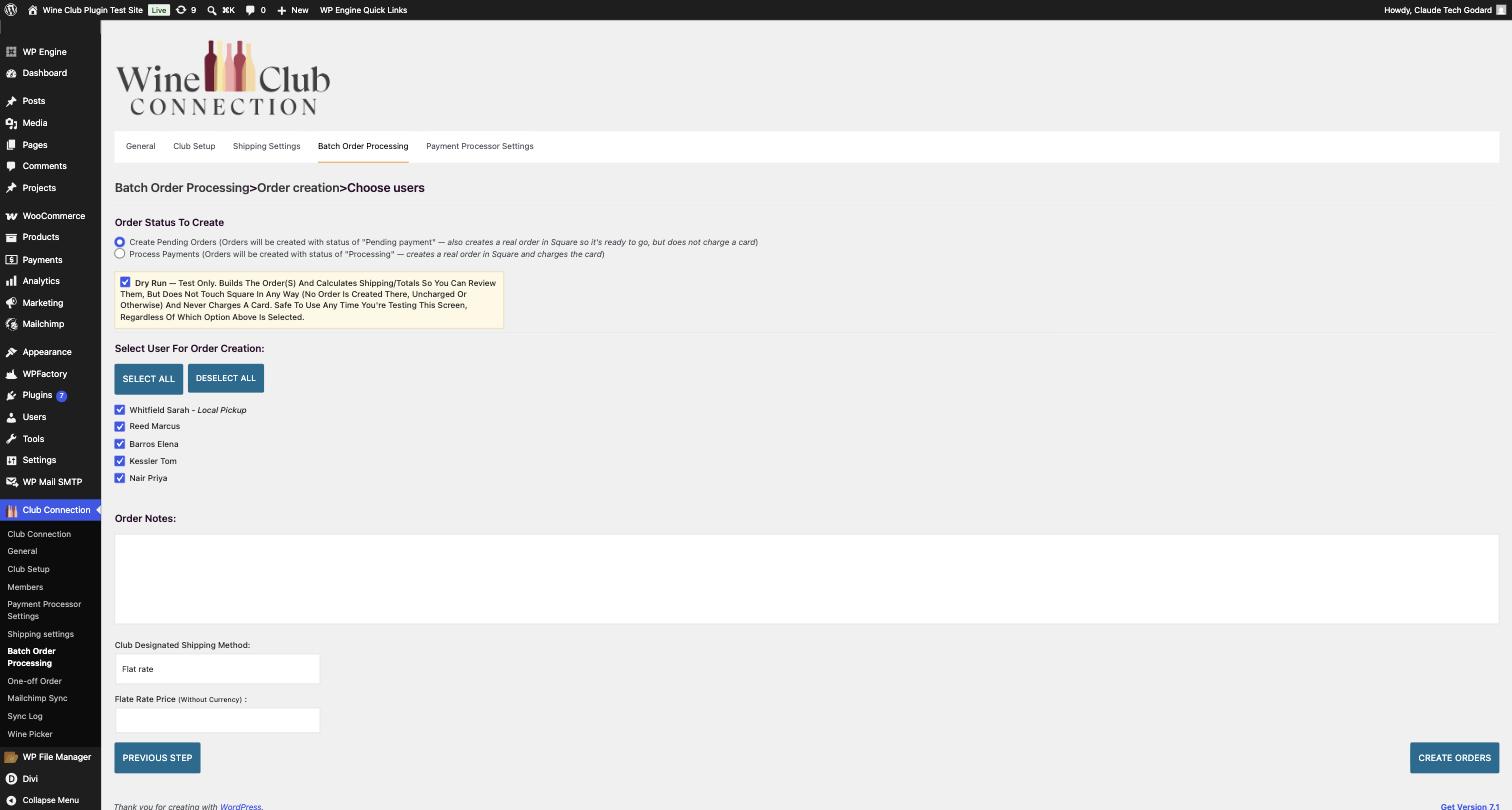
Order Status To Create:
- Create Pending Orders — orders are created with status "Pending payment", and a real order is created in Square so it's ready to go. No card is charged.
- Process Payments — orders are created with status "Processing", and each member's stored card is charged.
Dry Run sits directly underneath, and overrides both. See Dry Run Mode.
Select User For Order Creation lists every member of the club, with Select all and Deselect all. Anyone flagged for local pickup is marked Local pickup right in the list.
Order Notes are added to every order in the run.
Club Designated Shipping Method overrides the club default for this run only. Choosing Flat rate reveals a Flate Rate Price box; choosing a UPS method reveals a service picker (Ground, 3 Day Select, 2nd Day Air and so on). Leave the service picker alone and the cheapest UPS option for the order is used.
"Flat rate" here means the amount you type, not WooCommerce's Flat Rate method. The price in that box is the shipping charge, before the club's shipping discount. Leave the box empty and the plugin ignores the flat-rate choice and resolves shipping normally.
Then click Create Orders.
Each member's own club discount and shipping are calculated individually, so you can run a mixed batch and everyone gets the right price. Afterwards, review the orders in WooCommerce. Pending orders have a Process Payment button if you want to charge them later.
Dry Run Mode
Dry run is the safety net. Use it constantly.
Tick Dry run on Batch Order Processing or the One-off Order screen and the plugin will build every order in full, calculate real shipping rates and real discounts, and show you exactly what each member would be charged. It will not charge any card, and not touch your payment processor in any way. No order is created in Square, charged or otherwise.
Orders are created On Hold with a "DRY RUN" note so they're easy to spot and delete.
Dry run overrides everything. Even with "Process Payments" selected, nothing is charged while dry run is ticked. Charging requires two deliberate choices: Process Payments selected and dry run unticked.
On the One-off Order screen, dry run is ticked by default. On Batch Order Processing it is not, so tick it yourself before every test run.
Use dry run whenever you change shipping settings, discounts, clubs or product pricing. It costs nothing and it shows you the real numbers before real money moves.
One-off Orders
For a custom order outside your normal club run. A member wants an extra case, or you're sending a replacement.
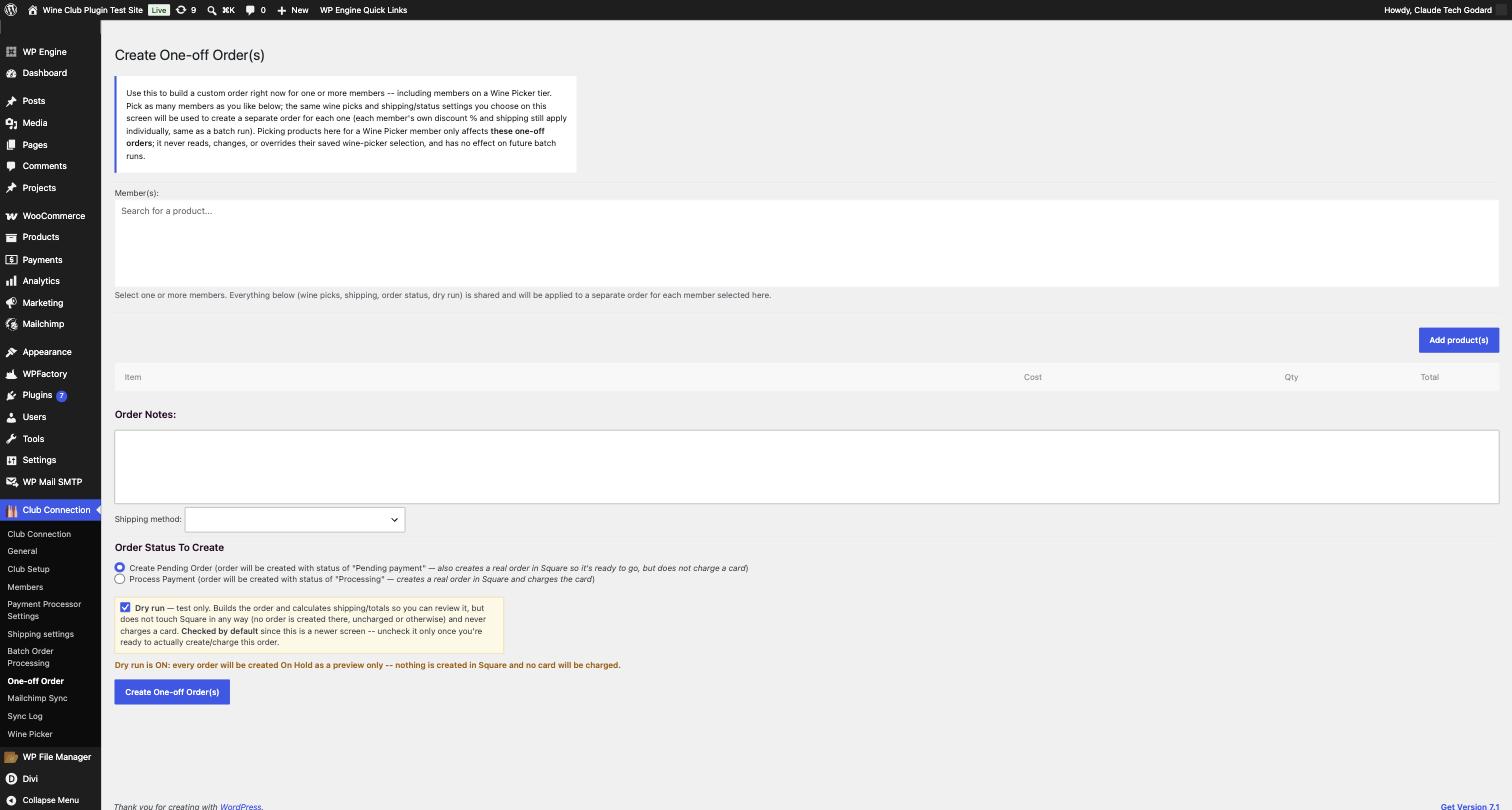
Club Connection → One-off Order:
- Choose one or more Members. Everything below is shared and applied to a separate order for each member you select.
- Add product(s) from your whole catalogue, not just the club wine list.
- Add Order Notes, choose a Shipping method and an order status.
- Click Create One-off Order(s).
Each member's own discount and shipping still resolve individually. If a member is on a wine-picker club, picking products here affects these one-off orders only. It never reads, changes or overrides their saved wine-picker selection, and has no effect on future batch runs.
A line above the button spells out in plain language exactly what will happen when you click it. Read it.
The Wine Picker
Lets members choose their own wines within the rules you set. Available for any club with a Bottles Per Shipment value.
Setting up the wine list
Tag the wines members may choose into the Wine Club Selection product category. The plugin creates this category for you the first time it's needed. Every club draws from the same list.
Opening a selection window
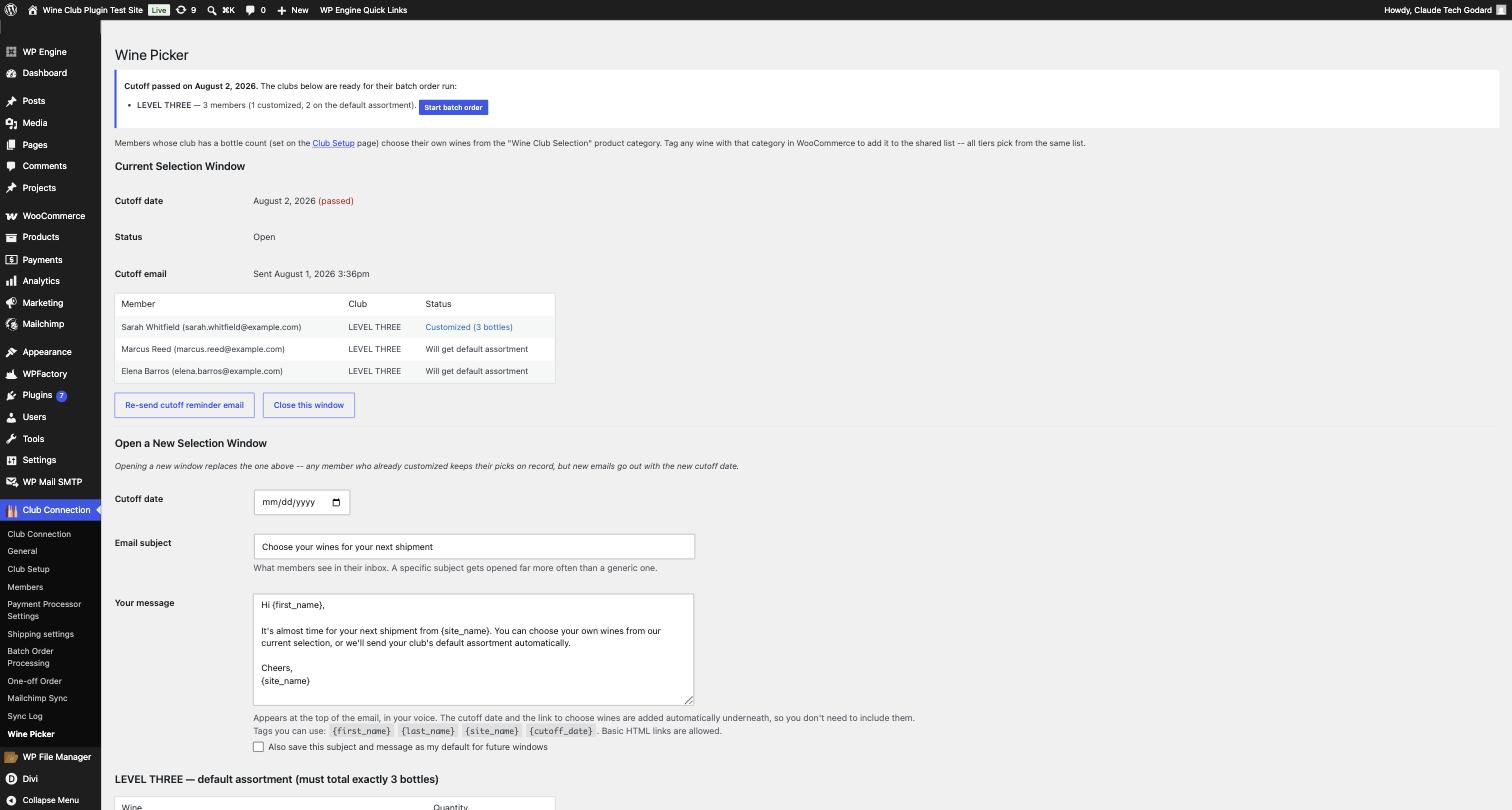
Go to Club Connection → Wine Picker:
- Set a Cutoff date.
- Write the email, or accept your saved defaults.
- For each club, set the default assortment that ships to anyone who doesn't customise. It must total exactly that club's bottles per shipment, and the screen shows a running Total: 0 / 3 so you can't get it wrong.
- Click Open selection window and email members.
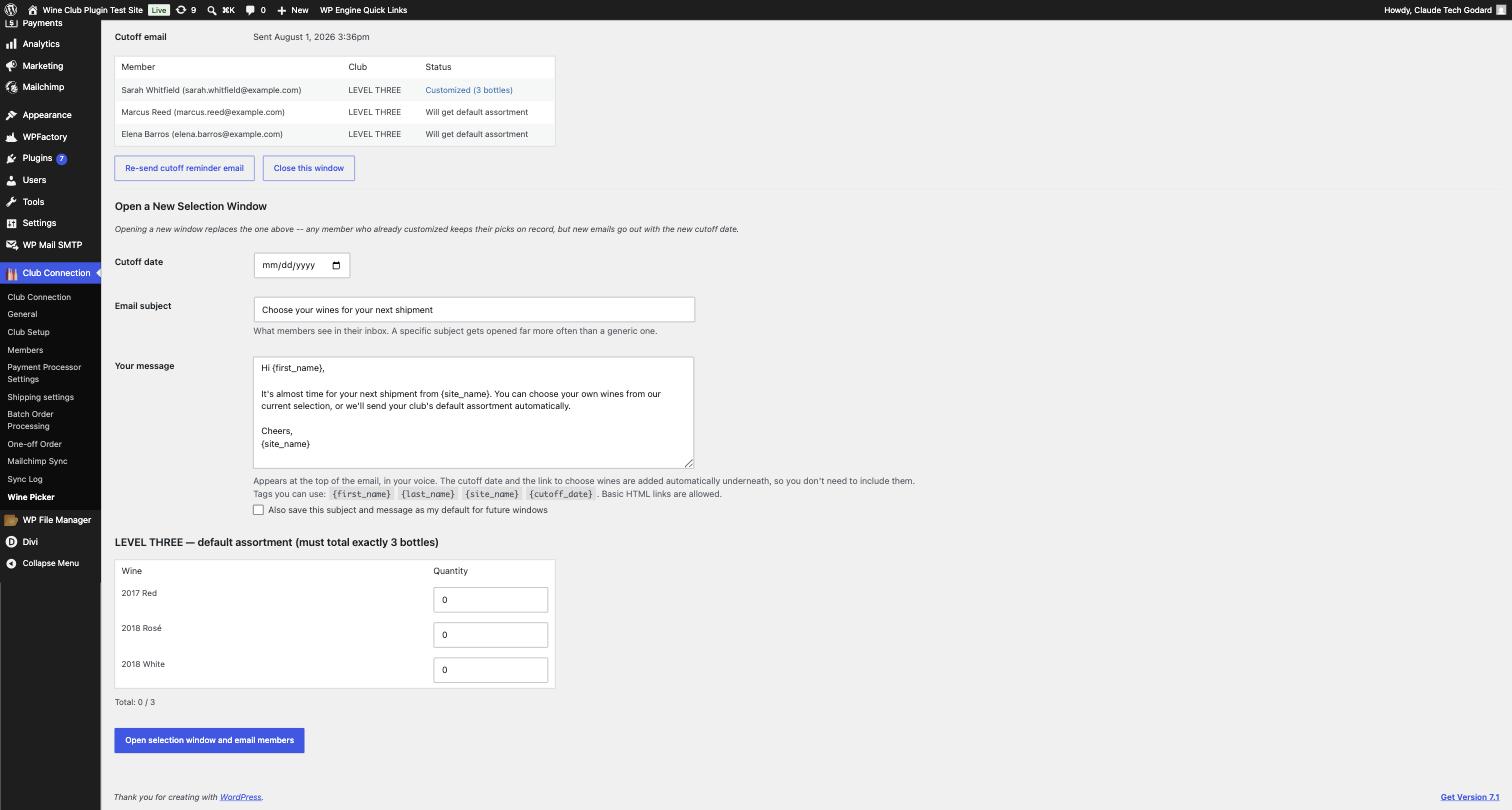
Opening a window emails every active member of a picker club with the cutoff date and a link. Paused members are not emailed. Opening a new window replaces the one above it: members who already customised keep their picks on record, but new emails go out with the new cutoff date.
Writing the email
Email subject and Your message are both pre-filled with your saved defaults, so opening a window takes no extra effort. Edit either when you've got something specific to say about a release, and tick Also save this subject and message as my default for future windows if you want the new wording to stick.
Your message appears at the top of the email in your own voice. The cutoff date and the link to choose wines are added underneath automatically, so you never need to include them and they can't be lost in editing.
Tags you can use anywhere in the subject or message:
| Tag | Becomes |
|---|---|
{first_name} |
The member's first name, or "there" if you don't have it |
{last_name} |
The member's last name |
{site_name} |
Your site's name |
{cutoff_date} |
The cutoff date, written out |
Basic HTML links and formatting are allowed, so you can point at a tasting note or a release page.
Watching the window
The Current Selection Window panel shows the cutoff date, whether the window is open, when the cutoff email went out, and a per-member table: who has Customized and who Will get default assortment. Click a member's "Customized" link to see their picks.
Two buttons sit underneath. Re-send cutoff reminder email sends members exactly what they received the first time rather than regenerating it. Close this window ends it early.
What members see
Under My Account → Choose Your Wines, members pick from the list. A running total shows how many bottles they've chosen, and they can't submit until it matches their club exactly. They can change their selection as often as they like until the cutoff. Re-submitting replaces their previous choice rather than adding to it.
Members can mix wines freely. There are no sub-rules like "at least two reds."
After the cutoff
Once the cutoff passes, the Wine Picker page shows a notice at the top listing every club in that window, how many members customised, how many are on the default, and a Start batch order button that jumps straight into Batch Order Processing with the right club already chosen.
Run the batch as normal. Each member gets their own picks, and everyone else gets the default.
Customising is opt-in for members, never mandatory. Anyone who ignores the email gets the default assortment and their shipment goes out on time.
Square Sync
Keeps club membership visible in Square, in both directions.
WordPress to Square
Whenever a member joins, changes club, pauses or cancels, three custom attributes are updated on their Square customer record:
| Attribute | Contains |
|---|---|
| Wine Club Tier | Their current club |
| Wine Club Discount | Their discount percentage |
| Wine Club Status | Active, paused or cancelled |
Tasting room staff can see club standing on the customer profile without switching systems. The discount is informational: staff apply it at the till, it isn't applied automatically.
Square to WordPress
Staff can set a customer's club directly in Square and it syncs back to your site. A brand-new walk-in who has never visited your website gets a WordPress account created automatically, and receives a secure "set your password" email. No password is ever sent in plain text.
Setting it up
- On Payment Processor Settings, click Set Up Square Custom Fields. This creates the three Customer Custom Attribute Definitions on your Square account for you. It's safe to click more than once: existing fields are left alone.
- In Square, go to Customers → Settings → Configure Profiles and turn on Wine Club Tier (and Wine Club Status, if you want staff editing that too) so the fields actually appear when adding or editing a customer. Square has no API for this step, so it's the one part nobody can do on your behalf. Without it the fields exist but stay invisible.
- Create a webhook subscription in Square's Developer Console pointed at the URL printed on the settings screen. It looks like
https://yoursite.com/wp-json/wine-club/v1/square-webhook - Subscribe to the events customer.created and customer.updated.
- Copy the signature key Square gives you into the matching field: the production field if you're live, the sandbox field if you're testing.
The signature key is required. The webhook verifies every message from Square and rejects anything it can't confirm. Without the key, nothing will sync.
Sandbox and production are entirely separate in Square. Definitions and webhooks created in one do not exist in the other, and you need the Sandbox Developer Console for one and the live console for the other. Check the mode status line on the settings screen before troubleshooting anything.
Mailchimp Sync
Keeps your club segments accurate without a manual sync button. There's no "Sync Now" to remember: club tier, pause and cancel status, and pickup preference all sync the moment they change.
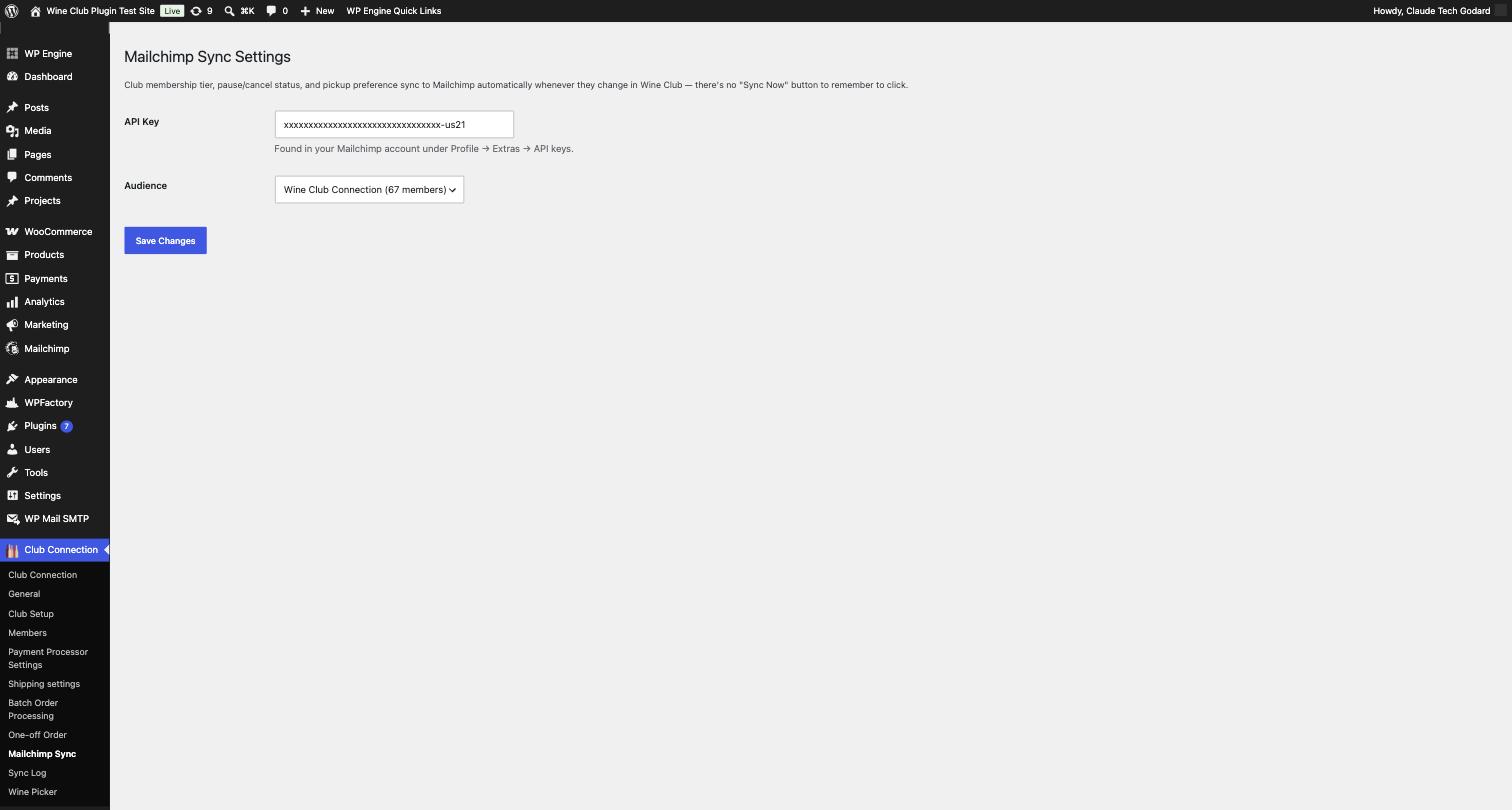
Go to Club Connection → Mailchimp Sync, enter your API Key (Mailchimp account → Profile → Extras → API keys), and choose your Audience.
What syncs, the moment a membership changes:
- CLUBLEVEL merge field, set to the member's current club
- Wine Club Member tag, added while active or paused
- On cancellation, the tag is removed and CLUBLEVEL is cleared, so former members drop out of club-targeted campaigns straight away
If CLUBLEVEL is a fixed-choice field in your audience and you add a new club, the plugin adds the new option automatically rather than failing. Converting CLUBLEVEL to a plain text field removes the need for that step and is simpler long term.
Existing subscribers are never re-subscribed. If someone unsubscribed themselves, syncing their club status will not opt them back in.
Sync Log
Club Connection → Sync Log shows the last 20 failed sync attempts for each integration, Square and Mailchimp in separate tables, each with its own clear button. Successful syncs run silently and never appear here.
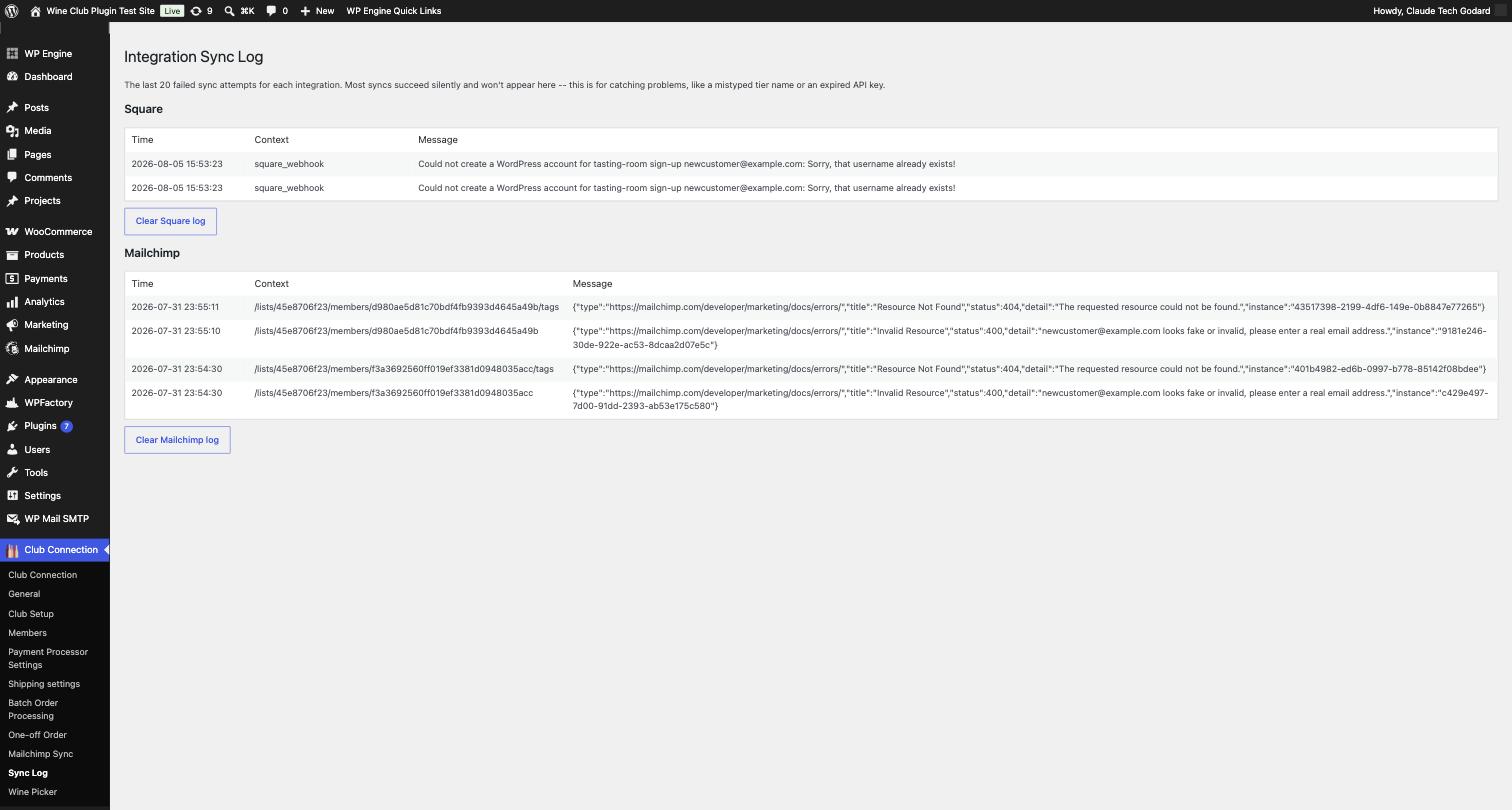
Check here first if club status isn't appearing in Square, a member isn't tagged in Mailchimp, or a tasting room signup didn't reach your site. A mistyped club name or an expired API key shows up here in plain language instead of a server log.
Need a hand? I am here to help!
Whether you have a question about setting up your membership levels, configuring shipping settings, processing payments, or anything else related to our plugin, we've got you covered. Simply reach out to us via our Contact Support page, or send an email to [email protected], and we'll get back to you promptly. We value your experience and are committed to ensuring the smooth running of your wine club. Let's work together to make your wine club the best it can be!